***You can purchase an INEXPENSIVE AD-FREE PDF of this pattern on Etsy HERE! This beautifully formatted PDF includes ALL the step-by-step photos and graphics and is a total of 13 pages including the cover page! You can also purchase a convenient Lion Brand Yarn kit that contains ALL the Feels Like Bliss yarn you will need and a digital version of the pattern – get the kit HERE!
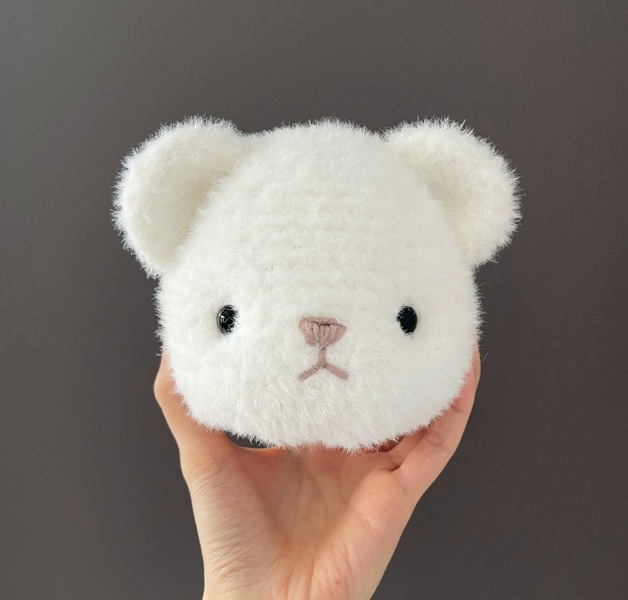
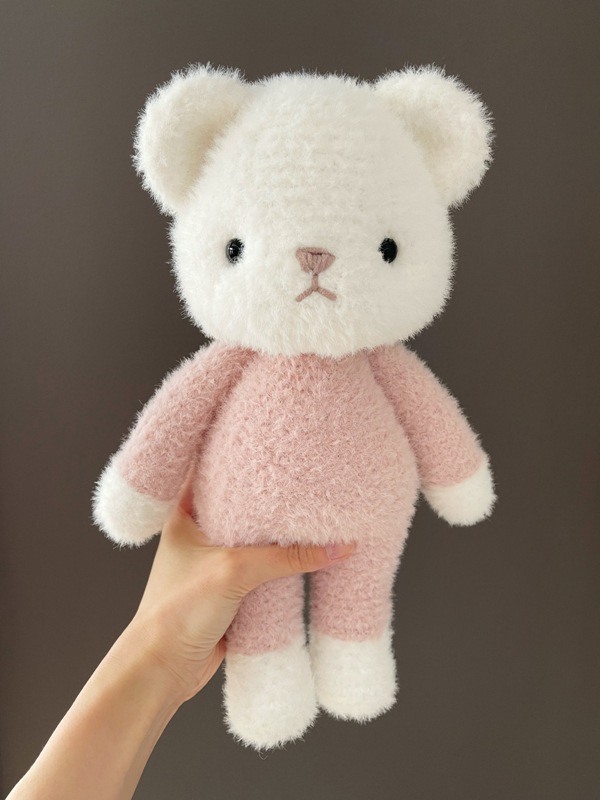
Crochet these adorably cozy teddy bears wearing pajamas! They are perfect for cuddling using a delightfully soft yarn!
Materials:
- Feels Like Bliss yarn (level 5 bulky) – each skein is 100 g/109 yds: 2 skeins of main color (I used nearly an entire skein of yarn for the bear, so it is recommended that you buy 2 skeins in case – Optic White or Cocoa) and 1 skein of contrast color (70-90 g/76-98 yds): Blush or Sky; purchase the kit HERE
- 5 mm Clover Amour Hook
- 12 mm safety eyes
- Bent tip tapestry needle
- Fiberfill
- Lock Ring stitch markers
- Worsted weight (level 4) yarn for the nose: I used “Made With Love The Cottony One Yarn” in Marvellous Mushroom (pinkish beige) and “Hot Cocoa” (brown)
- Optional: Two small buttons and embroidery floss for bottom pajama flap
Notes:
- The main color is used for the head, feet, hands and tail of the bear. The contrast color is used for the pajamas. You can also choose to make the bear in entirely one color so it is not wearing pajamas!
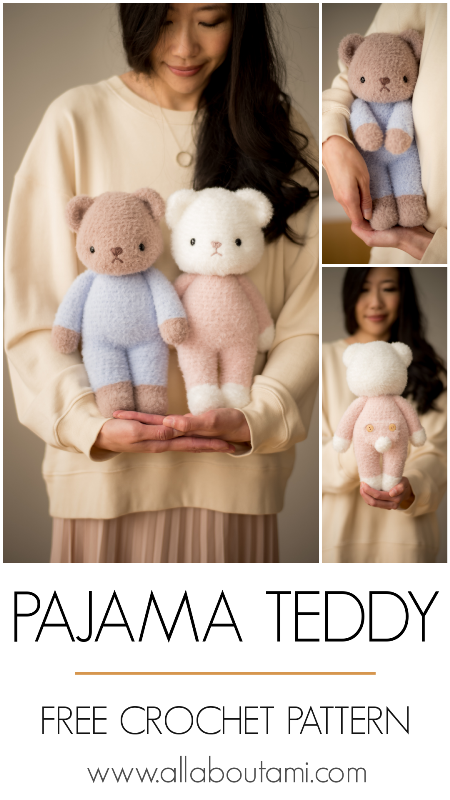
- There are two body sizes written up for the pajama teddies. While the head sizes are the same, Body 1 (white teddy with pink pajamas) is a smaller body that results in a teddy with an oversized head. Body 2 (brown teddy with blue pajamas) is a larger body that results in a teddy that is in proportion to the head. For reference, Body 1 has a maximum stitch count of 38 with 36 rounds. Body 2 has a maximum stitch count of 45 with 38 rounds.
- The arms are only slightly different for Body 1 and Body 2 (one less round) and you can follow the same instructions for the Head, Ears, Bottom Pajama Flap and Tail for both bears.
- Please check out my blog posts entitled “Amigurumi for Beginners“, “How to Read Amigurumi Patterns“, “The Magic Circle“, “The Invisible Decrease“, “The Right Side of Amigurumi” and “Amigurumi Nose Tutorial” for helpful tips and techniques that you can use when crocheting this amigurumi.
- Work in continuous rounds so there is no visible seam (do not slip stitch to close each round).
- Fluffy yarn is challenging to work with, so please reference my tips below.
- It is very important to use a stitch marker and keep your place within the rounds since there is shaping for the protruding feet and protruding belly where increases are stacked towards one side.
- A technique called eye indentation is used for the head, which pulls the safety eyes back to give them more depth and to protrude the cheeks. Before you begin crocheting the head, cut two long strands of yarn (approximately 20”/51 cm each) to use for the eye indentation. The yarn around the eyes is trimmed so that the eyes are more visible.
- The legs are crocheted separately and then joined together to create the body. The feet are designed to protrude to the front, so be sure that they are positioned correctly when joining the legs together.
- When switching yarn colors, work last stitch in old color: work as if typical single crochet until two loops are left on the hook (i.e. insert hook into stitch, yarn over, pull up a loop). Use new color to yarn over and pull through both loops. Continuing crocheting with new color.
- You will use a special technique after switching yarn colors to give a clean look: stitches are worked in the back loops only (BLO).
- Increases are stacked towards the front of the body to give a protruding belly.
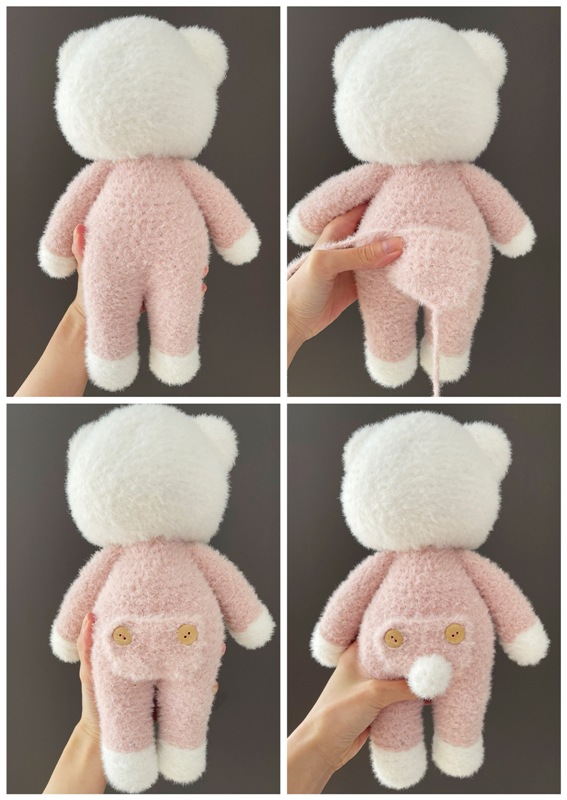
- You can crochet and attach an optional bottom pajama flap (worked in turned rows) to the back of the pajamas. Two buttons are sewed on as decoration (not recommended if making for babies). The tail is then sewed onto this flap!
- If you want the body to be larger, you can switch to a larger hook size (e.g. 5.5 or 6 mm) when crocheting the body.
- Inc (increase) = Work 2 sc in the next stitch. [1 stitch becomes 2 stitches.]
- Dec (I use the invisible decrease): Insert hook into front loops of the next two stitches. Yarn over and draw through first two loops. Yarn over and draw through remaining two loops.
Fluffy Yarn Tips:
It can be challenging working with fluffy yarn if you have never worked with this special type of yarn before (not recommended for complete beginners). Here are some tips when working with fluffy yarn:
- You can try to feel for the next stitch and insert your hook into the next gap as it can be challenging to see your stitches. This means that the yarn is more forgiving since you cannot easily see mistakes, and the fuzz helps to blur the stitches together.
- I highly recommend using a stitch marker to mark the end of each round. This helps you keep your place in case you need to put down your work or if you get interrupted. You can also use the stitch marker as a guide and reference point for how many stitches you should be making at any given point around the circle. For example, if you know that there are a total of 42 stitches in a round, you should have 21 stitches by the halfway point (halfway across the circle). By the one quarter mark, you should have approximately 10 or 11 stitches. If you do not reach the desired number of stitches by the time you reach the stitch marker, you can frog the stitches (back to the stitch marker) and try again!
- Record your number of rounds using a pencil and paper or on your phone. It can be challenging trying to count your rounds when looking at a piece, and it can be easy to lose your place (unlike amigurumi using regular yarn, where you can easily count how many rounds you have completed and where you are in a pattern).
PATTERN:
Before beginning to crochet, cut two long strands of yarn (at least 20”/51 cm each) and set aside for eye indentation.
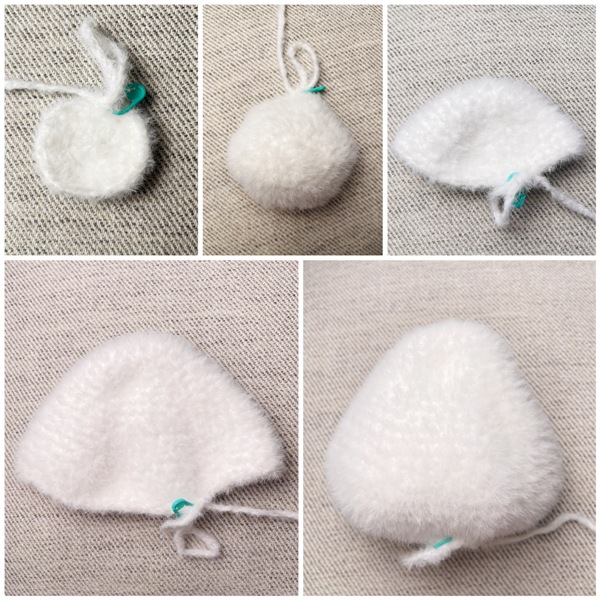
Head:
Using main color,
R1: 6 sc in magic ring. (6 sts)
R2: *Inc*, rep 6 times. (12 sts)
R3: Sc 1, Inc x 3, Sc 3, Inc x 3, Sc 2. (18 sts)
R4: Sc 2, Inc. *Sc 1, Inc*, rep 2 times. Sc 3, Inc. *Sc 1, Inc*, rep 2 times. Sc 3. (24 sts)
R5: Sc around. (24 sts)
R6: *Sc 3, Inc*, rep 6 times. (30 sts)
R7: Sc around. (30 sts)
R8: *Sc 4, Inc*, rep 6 times. (36 sts)
R9: Sc around. (36 sts)
R10: *Sc 5, Inc*, rep 6 times. (42 sts)
R11: Sc around. (42 sts)
R12: *Sc 6, Inc*, rep 6 times. (48 sts)
R13: Sc around. (48 sts)
R14: *Sc 7, Inc*, rep 6 times. (54 sts)
R15: Sc around. (54 sts)
{You can place a stitch marker between Rounds 14 and 15 to indicate where you will place the safety eyes later on.}
R16: *Sc 8, Inc*, rep 6 times. (60 sts)
R17-19: Sc around. (60 sts)
R20: *Sc 8, Dec*, rep 6 times. (54 sts)
R21: Sc around. (54 sts)
R22: *Sc 7, Dec*, rep 6 times. (48 sts)
R23: *Sc 2, Dec*, rep 12 times. (36 sts)
Place safety eyes between Rounds 14 and 15, about 9 stitches apart. DO NOT snap in washers yet!
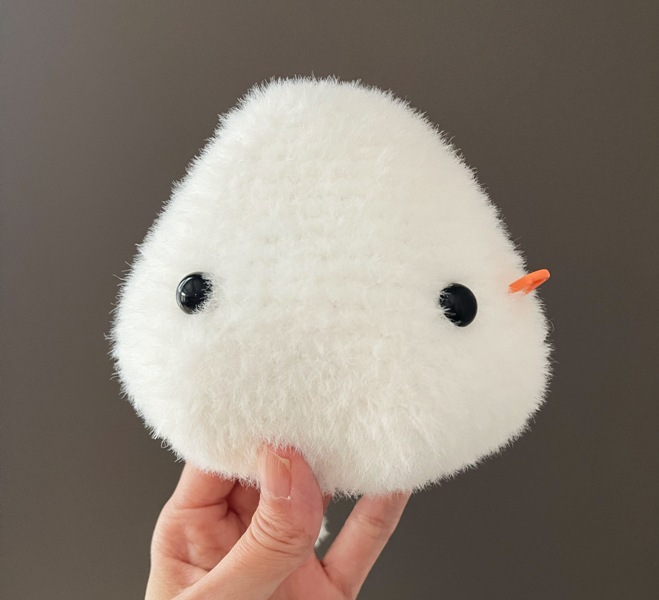
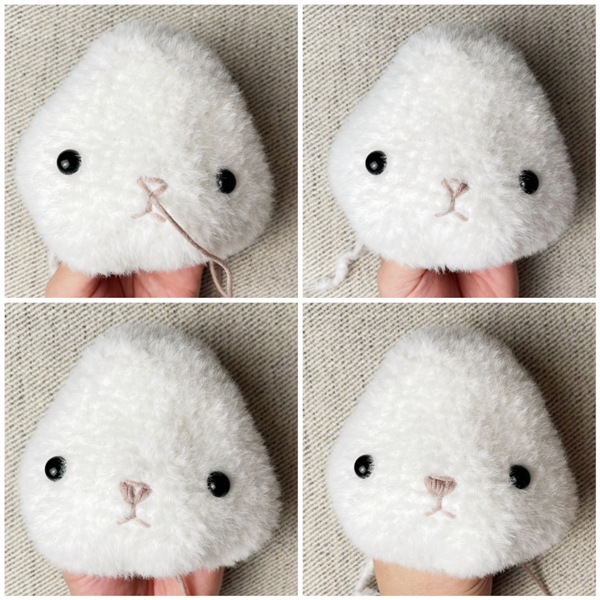
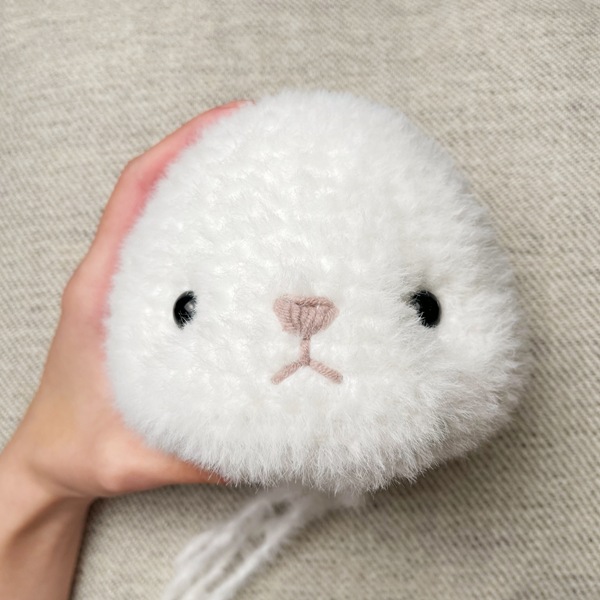
With eyes loosely in place, embroider nose using worsted weight yarn and needle into an upside down triangle as shown below.
The top of the upside down triangle is centered between the eyes and begins at the bottom of Round 15. The dimensions of our triangle nose are: 0.6”/1.6 cm wide and 0.4”/1 cm long.
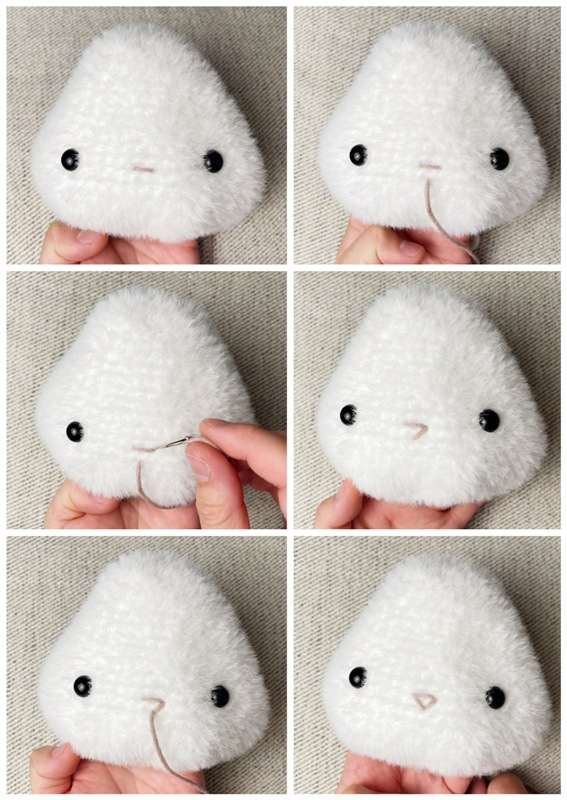
Next, embroider an upside down Y below the triangle as shown below. The length from the top of the triangle to the bottom of the upside down Y is: 0.8”/2 cm.
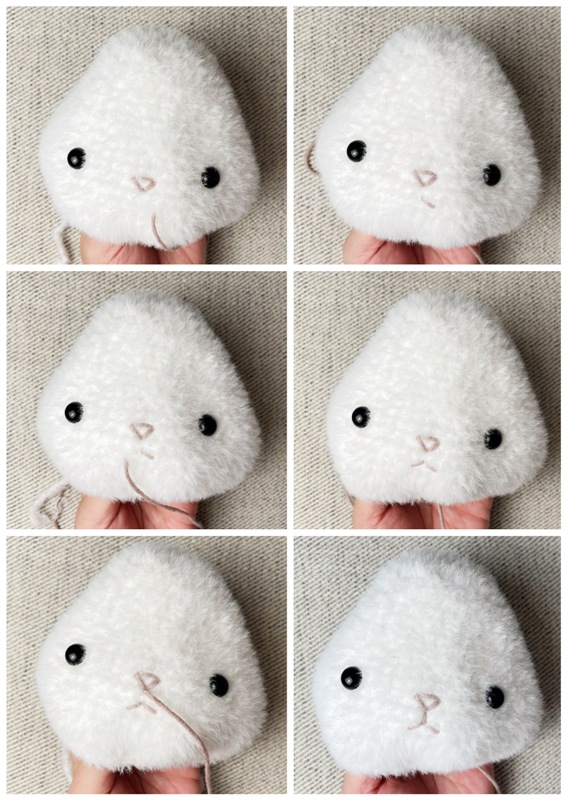
Lastly, fill in the triangle with embroidered lines.
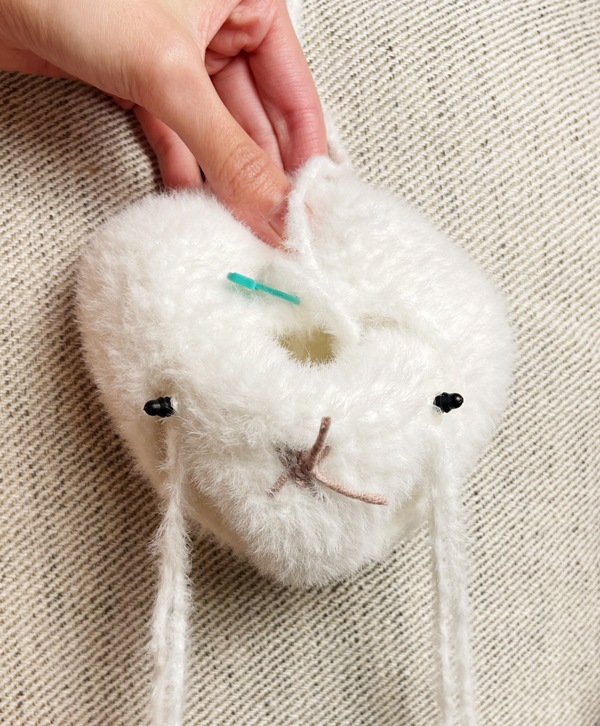
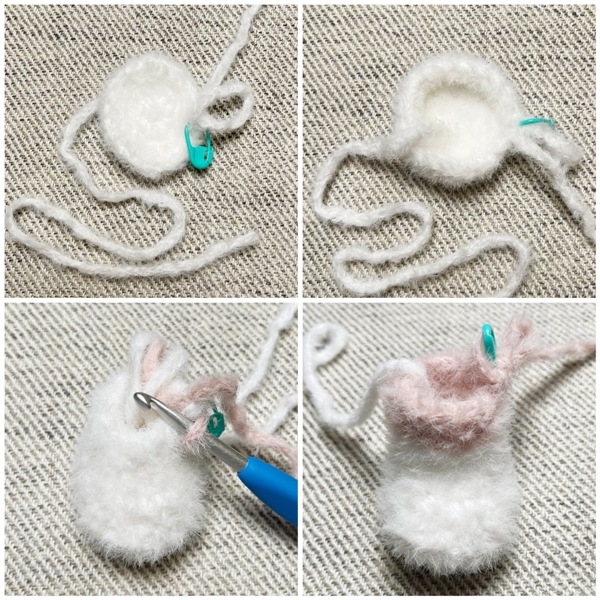
To give the face more definition, we will be using a technique called eye indentation. After inserting the safety eyes (without attaching washer/backing yet), use the yarn strands you set aside at the beginning and tie knots around the post of each safety eye. Snap in the washers.
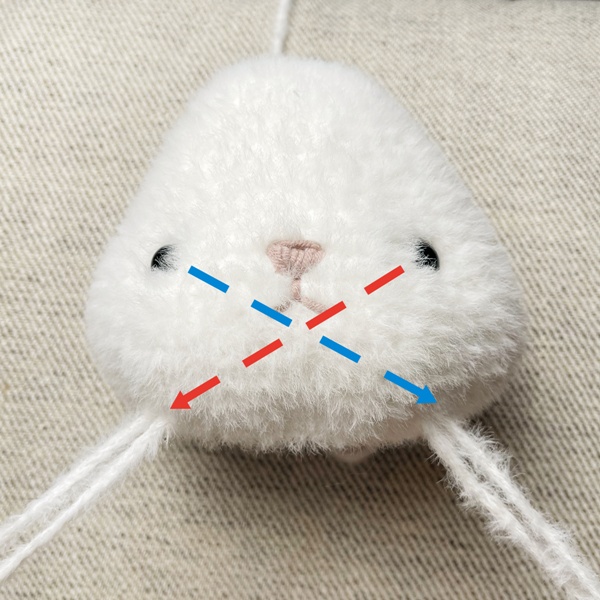
Have the strands cross each other inside the head and have them exit out the bottom of the front of the head between Rounds 21 and 22. The two strands from the same safety eye should exit about 1 stitch apart, and it should approximately line up below the opposite safety eye as shown in the next photos.
Picture showing the inside of the head with yarn strands tied around safety eyes.
Picture showing the yarn strands crossing each other inside the head and exiting between Rounds 21 and 22, lining up with the opposite safety eye.
Stuff head, making sure there is stuffing above and below the criss-crossed eye indentation strands. Be sure that the cheeks have stuffing.
R24: *Sc 1, Dec* rep 12 times. (24 sts)
R25: *Dec*, rep 12 times. (12 sts)
Finish stuffing as needed.
R26: *Dec*, rep 6 times. (6 sts)
Fasten off and thread the yarn tail through a needle. Thread the tail through the front loops of the remaining 6 stitches and pull through to close up the hole. Tie a knot and weave in the tail.
Finish off the eye indentation: grab the two sets of yarn strands and tie them together tightly into a knot underneath the head to protrude the cheeks and make the eyes sink in. Weave in the ends.
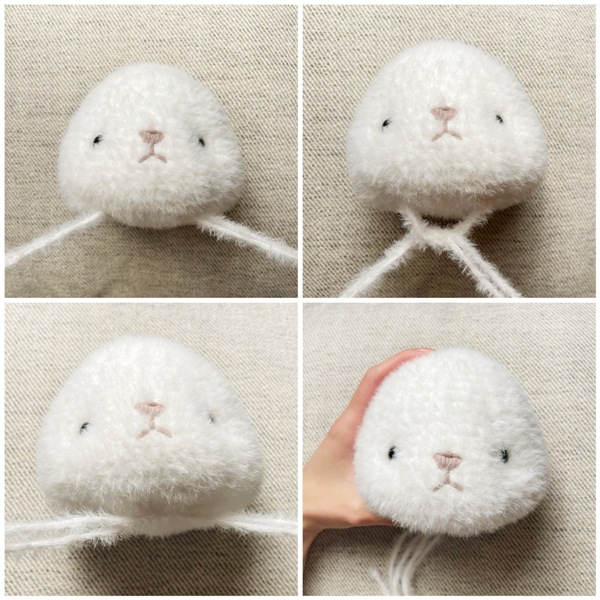
Trim the fuzz around the eyes with a sharp pair of scissors to help them stand out more.
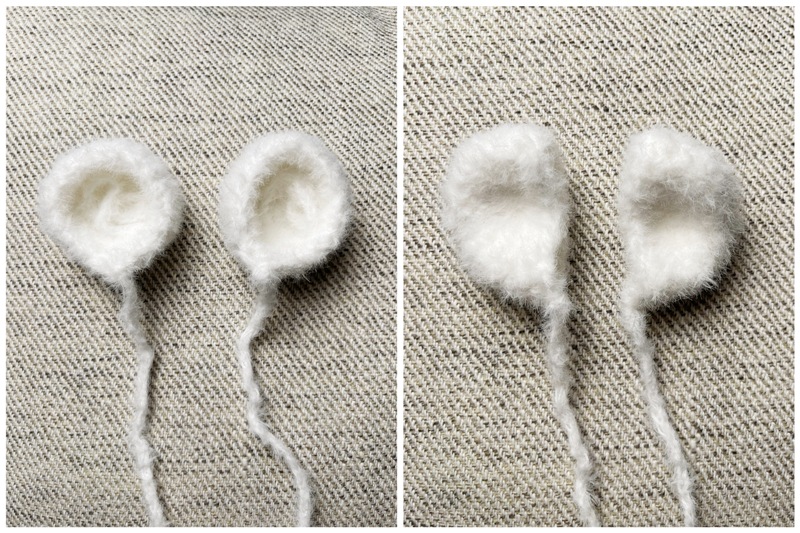
Ears (make 2)
Using main color,
R1: 6 sc in magic ring. (6 sts)
R2: *Inc*, rep 6 times. (12 sts)
R3: *Sc 1, Inc*, rep 6 times. (18 sts)
R4-6: Sc around. (18 sts)
Fasten off and leave long end for sewing. Flatten sphere and sew onto sides of head, about 2.4”/6 cm apart.
BODY 1 (Smaller Body):
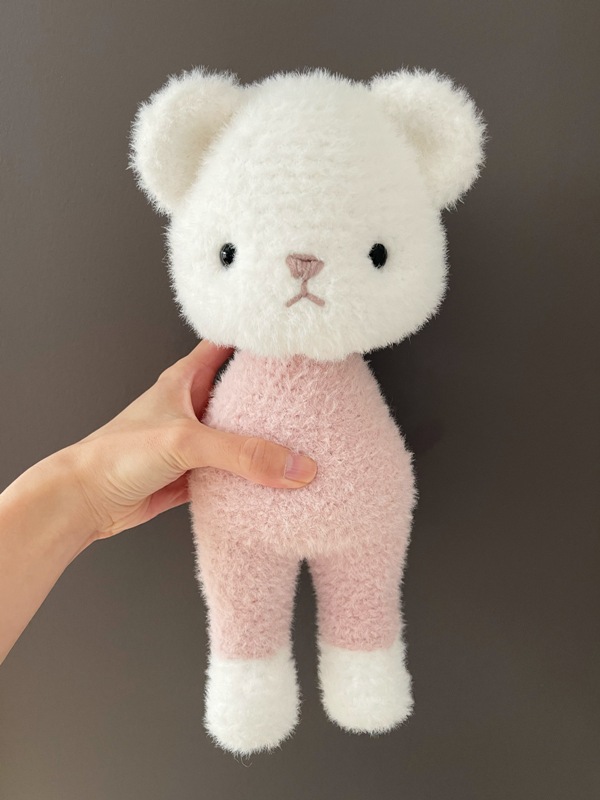
{White Bear with Pink Pajamas in photos}
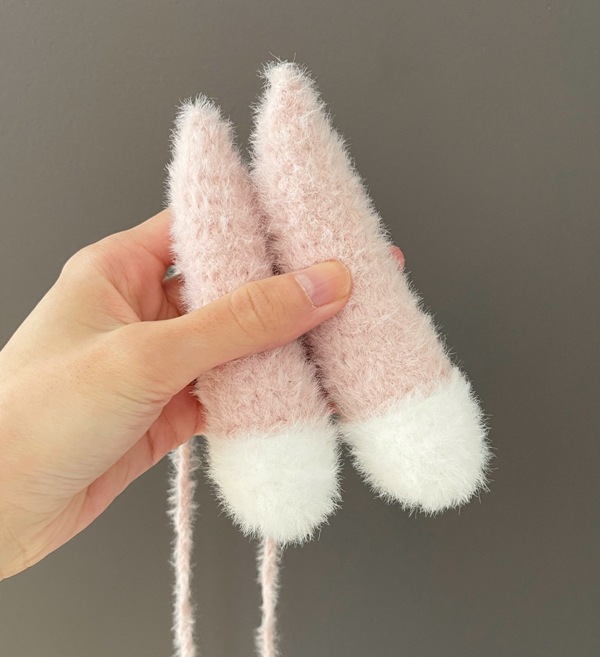
We begin with the feet using the main color and then switch to the contrast color when crocheting the legs. Once the two legs have been crocheted, they will be joined together. Note that the front of the feet protrude outwards, so be sure that they are positioned correctly. The body is then crocheted while continuing to use the contrast color.
Feet for Body 1 (make 2)
Using main color,
R1: 12 sc in magic ring. (12 sts)
R2: *Inc x 3, Sc 3*, rep 2 times. (18 sts)
R3: Sc 3, Inc, Sc 8, Inc, Sc 5. (20 sts)
R4: In BLO, sc around. (20 sts)
R5: *Dec*, rep 4 times. Sc 12. (16 sts)
R6: *Dec*, rep 3 times. Sc 8, Dec. (12 sts)
R7: Sc around. (12 sts)
Stuff feet.
Switch to contrast color for Legs,
R8: In BLO, slip stitch loosely around. (12 sts)
R9: In BLO, single crochet around. (12 sts)
R10-13: Sc around. (12 sts)
R14: *Sc 2, Inc*, rep 4 times. (16 sts)
R15-17: Sc around. (16 sts)
Stuff legs.
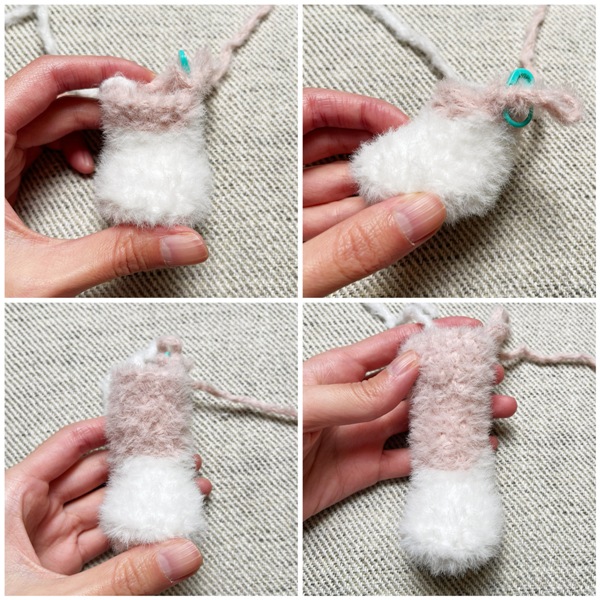
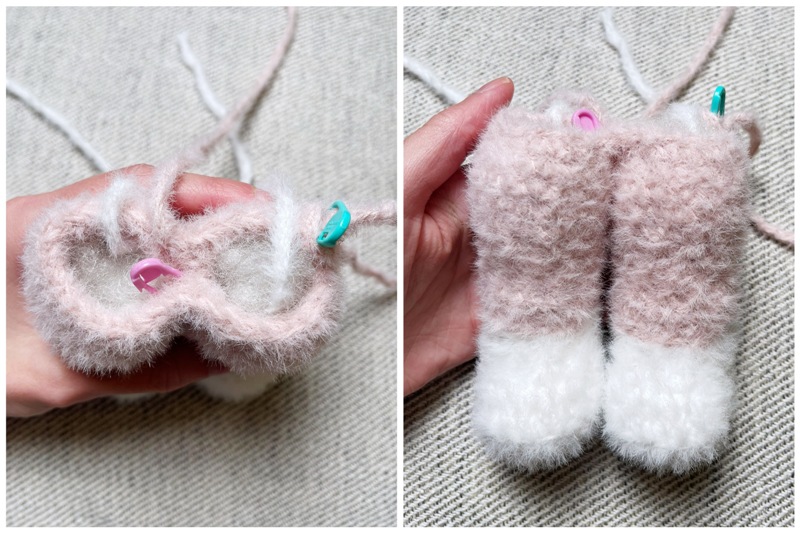
Fasten off Leg 1 and leave a long yarn tail to seam up the hole created at the leg join later on. DO NOT fasten off Leg 2.
Leg 1: Count two stitches away from last stitch of round (counting clockwise) and place stitch marker.
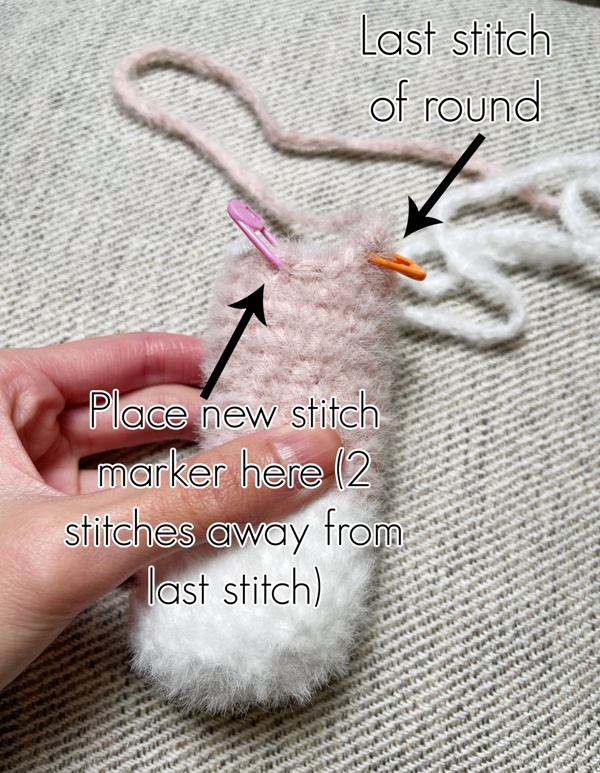
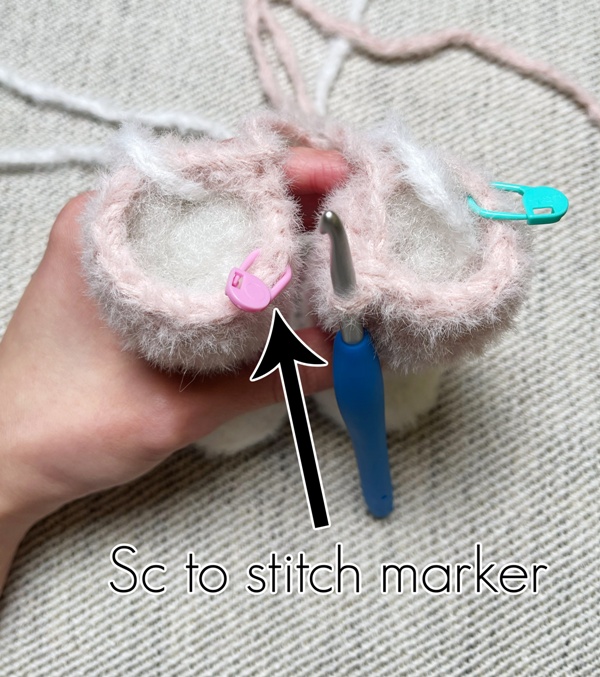
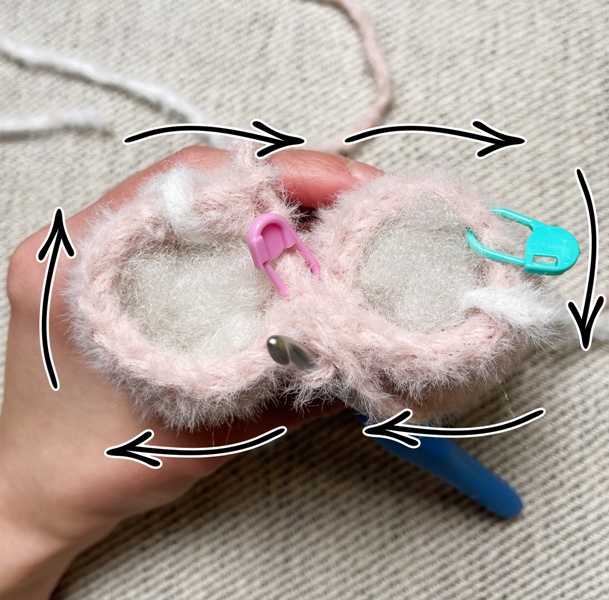
For Leg 2, continue on as we will now join the two legs together and crochet the Body:
R18: (Continuing from Leg 2) Sc 9, single crochet to stitch marker on Leg 1. Sc 15 around Leg 1, Sc 7 around Leg 2. (32 sts)
R19: Sc around. (32 sts)
In the next round, increases will be placed towards the front of the body to shape the protruding belly:
R20: Sc 4. *Inc, Sc 1*, rep 6 times. Sc 16. (38 sts)
R21-23: Sc around. (38 sts)
R24: Sc 31, Dec x 2, Sc 3. (36 sts)
R25: Sc around. (36 sts)
R26: *Sc 7, Dec*, rep 4 times. (32 sts)
R27-28: Sc around. (32 sts)R29: *Sc 6, Dec*, rep 4 times. (28 sts)
R30-31: Sc around. (28 sts)
R32: *Sc 5, Dec*, rep 4 times. (24 sts)
R33: Sc around. (24 sts)
R34: *Sc 4, Dec*, rep 4 times. (20 sts)
R35-36: Sc around. (20 sts)

Fasten off and leave long end for sewing.
Use yarn tail from Leg 1 to sew up the hole created where the legs were joined together.
Stuff body to desired firmness.
Sew body to head.
Arms for Body 1 (make 2)
Using main color,
R1: 6 sc in magic ring. (6 sts)
R2: *Inc*, rep 6 times. (12 sts)
R3: *Sc 5, Inc*, rep 2 times. (14 sts)
R4-5: Sc around. (14 sts)
Switch to contrast color,
R6: In BLO, slip stitch loosely around. (14 sts)
R7: In BLO, single crochet around. (14 sts)
R8: *Sc 5, Dec*, rep 2 times. (12 sts)
R9-10: Sc around. (12 sts)
R11: *Sc 4, Dec*, rep 2 times. (10 sts)
R12-13: Sc around. (10 sts)
Gently stuff.
R14: *Sc 3, Dec*, rep 2 times. (8 sts)
R15-16: Sc around. (8 sts)
R17: *Sc 2, Dec*, rep 2 times. (6 sts)
R18: Sc around. (6 sts)
R19: *Sc 1, Dec*, rep 2 times. (4 sts)
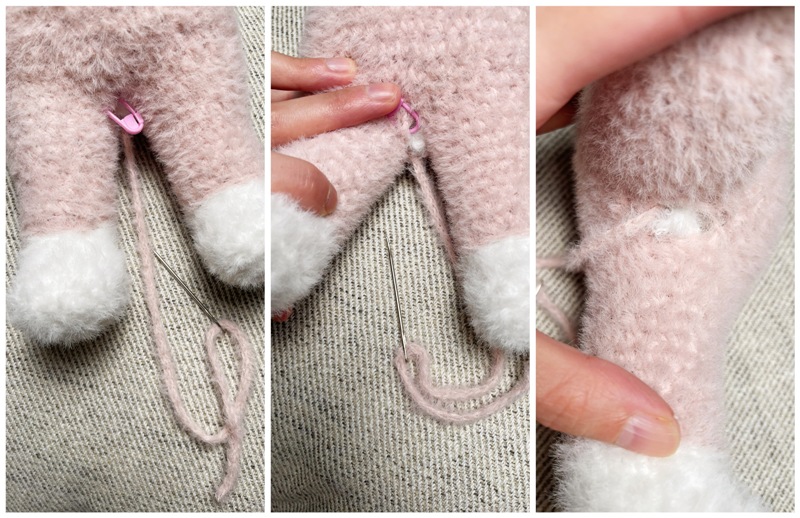
Fasten off and leave long end for seaming. Sew onto sides of body where body meets the head. Position the arms so that the color jog from the color change is not as visible from the front.
Bottom Pajama Flap:
{worked in turned rows}
Using contrast color,
Chain 11.
Row 1: Starting in second chain from hook, Sc 10. (10 sts)
Row 2: Chain 1, turn. Sc across. (10 sts)
R3-6: Repeat Row 2.
R7: Chain 1, turn. Dec x 2, Sc 2, Dec x 2. (6 sts)
R8: Chain 1, turn. Dec, Sc 2, Dec. (4 sts)
Fasten off and leave long end for sewing. Sew bottom of flap to back of teddy bear. Sew two buttons onto top of flap with embroidery floss.
Tail (optional):
Using main color,
R1:6 sc in magic ring. (6 sts)
R2: *Inc*, rep 6 times. (12 sts)
R3: Sc around. (12 sts)
R4: *Dec*, rep 6 times. (6 sts)
Fasten off and leave long end for seaming. Sew onto bottom of pajama flap.
BODY 2 (Larger Body):
Brown Bear with Blue Pajamas in photos}
Please reference BODY 1 tutorial photos!
We begin with the feet using the main color and then switch to the contrast color when crocheting the legs. Once the two legs have been crocheted, they will be joined together. Note that the front of the feet protrude outwards, so be sure that they are positioned correctly. The body is then crocheted while continuing to use the contrast color.
Feet for Body 2 (make 2):
Using main color,
R1: 12 sc in magic ring. (12 sts)
R2: *Inc x 3, Sc 3*, rep 2 times. (18 sts)
R3: Sc 1, Inc x 3, Sc 6, Inc x 3, Sc 5. (24 sts)
R4: In BLO, sc around. (24 sts)
R5: *Dec*, rep 4 times. Sc 16. (20 sts)
R6: *Dec*, rep 3 times. Sc 12, Dec. (16 sts)
R7-9: Sc around. (16 sts)
Stuff feet.
Switch to contrast color for Legs,
R10: In BLO, slip stitch loosely around. (16 sts)
R11: In BLO, single crochet around. (16 sts)
R12-16: Sc around. (16 sts)
R17: *Sc 3, Inc*, rep 4 times. (20 sts)
R18-20: Sc around. (20 sts)
Stuff legs.
Fasten off Leg 1 and leave a long yarn tail to seam up the hole created at the leg join later on. DO NOT fasten off Leg 2.
Leg 1: Count two stitches away from last stitch of round (counting clockwise) and place stitch marker.
For Leg 2, continue on as we will now join the two legs together and crochet the Body:
R21: (Continuing from Leg 2) Sc 12, single crochet to stitch marker on Leg 1. Sc 19 around Leg 1, Sc 8 around Leg 2. (40 sts)
R22: Sc around. (40 sts)
R23: Sc 7. *Inc, Sc 1*, rep 5 times. Sc 23. (45 sts)
R24-27: Sc around. (45 sts)
R28: *Sc 7, Dec*, rep 5 times. (40 sts)
R29-30: Sc around. (40 sts)
R31: *Sc 6, Dec*, rep 5 times. (35 sts)
R32: Sc around. (35 sts)
R33: *Sc 5, Dec*, rep 5 times. (30 sts)
R34: Sc around. (30 sts)
R35: *Sc 4, Dec*, rep 5 times. (25 sts)
R36: *Sc 3, Dec*, rep 5 times. (20 sts)
R37-38: Sc around. (20 sts)
Fasten off and leave long end for sewing.
Use yarn tail from Leg 1 to sew up the hole created where the legs were joined together.
Stuff body to desired firmness. Sew body to head.
Arms for Body 2 (make 2):
Using main color,
R1: 6 sc in magic ring. (6 sts)
R2: *Inc*, rep 6 times. (12 sts)
R3: *Sc 5, Inc*, rep 2 times. (14 sts)
R4-5: Sc around. (14 sts)
Switch to contrast color,
R6: In BLO, slip stitch loosely around. (14 sts)
R7: In BLO, single crochet around. (14 sts)
R8: *Sc 5, Dec*, rep 2 times. (12 sts)
R9-10: Sc around. (12 sts)
R11: *Sc 4, Dec*, rep 2 times. (10 sts)
R12-13: Sc around. (10 sts)
Gently stuff.
R14: *Sc 3, Dec*, rep 2 times. (8 sts)
R15-16: Sc around. (8 sts)
R17: *Sc 2, Dec*, rep 2 times. (6 sts)
R18-19: Sc around. (6 sts)
R20: *Sc 1, Dec*, rep 2 times. (4 sts)
Fasten off and leave long end for seaming. Sew onto sides of body where body meets the head. Position the arms so that the color jog from the color change is not as visible from the front.
Follow the same patterns for the Bottom Pajama Flap and Tail as Body 1!
*****************************
I collected teddy bears growing up, and I cannot believe how many teddy bears we have crocheted throughout the years! These Pajama Teddies are actually an updated version of my original “P.J. Teddy” design back from 2011. I am delighted that we could make a new rendition of teddy bears donning adorable pajamas, especially with the new skills and techniques that we have learned over the years. The “Feels Like Bliss” yarn is a wonderful choice for amigurumi since it gives stuffies a beautiful glow with its fuzziness. Even though it can be challenging to work with, you can still vaguely see the stitches (compared to other fluffy yarns where you cannot, such as the fleece yarns).
We originally crocheted the brown bear wearing blue pajamas, and we were not quite sure about the proportions since typically our amigurumi have larger heads and smaller bodies. Thus, we crocheted the white teddy wearing pink pajamas with a smaller body and asked our audience which one they liked better! The votes were perfectly split in half, so this encouraged me to write out the patterns for body body sizes – I hope you enjoy choosing which one you want to make. Feels Like Bliss comes in such lovely colors, so I know you will have fun picking different color combos! Once again, you can purchase the KIT HERE!
If you would like this amigurumi to be safe for babies, you can embroider the eyes (you can still use the eye indentation technique by pulling back the eyes) and omit the buttons from the pajama flap. You can try substituting yarn of different weights to achieve different sizes as well!
Enjoy crocheting these Pajama Teddies, everyone! You can use the hashtag #crochetpajamateddy on social media if you post about your bears!
Thank you to Lion Brand Yarn for sponsoring this post! This pattern is an original pattern by Stephanie Lau of All About Ami. Please do not claim this pattern as your own. If you wish to share this pattern, you may link to this pattern but please do not reprint it on your site. You may keep a copy for your own personal use but please DO NOT sell the pattern or distribute it.
You may sell products made from this pattern but please clearly credit the design to me, Stephanie Lau of All About Ami, and provide a link to my blog www.AllAboutAmi.com. Permission is NOT granted for mass production or factory manufacturing of any kind. Thank you for being respectful and for your understanding!