**You can purchase an INEXPENSIVE AD-FREE PDF of this pattern on Etsy HERE or LoveCrochet HERE! This beautifully formatted PDF includes the step-by-step pictures and is a total of 8 pages including the cover page. This pattern is also available in the “All About Ami Amigurumi PATTERN BUNDLE” which contains ALL the amigurumi patterns I’ve ever designed at a discounted price – check out the bundle HERE!
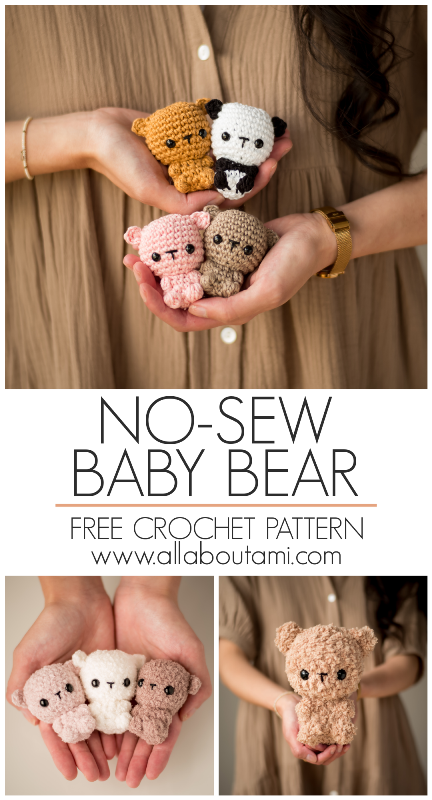
Description: Crochet these adorable teddy bears with absolutely zero seaming! Make them in a variety of colors and attach them to keychains so you can bring these bears wherever you go!
Materials:
- 24/7 Cotton Yarn (level 4 worsted weight yarn), ~ 10 g/19 yds; I used the colors Camel, Taupe, Pink Lemonade and Black & White for the Panda
- 2.75 mm Clover Amour Hook
- 7.5 mm safety eyes
- Lock ring stitch markers
- Fiberfill
- Black embroidery floss (for nose)
Notes:
- This teddy bear requires no sewing as some special techniques are used. During one of the last rounds of the head, the front loops are left untouched. After the head is closed up, we pick up these untouched front loops to begin the body. Bobble stitches are used for the two arms, two legs and the tail so they do not need to be seamed separately on. The two ears are crocheted directly onto the head.
- Work in continuous rounds so that there is no visible seam (do not slip stitch after each round).
- It is very important to keep track of your rounds with a stitch marker as the arms and legs are centered around the head. If the stitch count is off, the arms and legs will not be centered.
- Three different bobble stitches are used for the arms, legs and tail (see “Abbreviations & Special Sts” below). Once you have crocheted the stitch right after the bobble (the single crochet), push the bobble out to the right side to ensure that it is protruding outwards.
TIP: Try substituting yarns of various thicknesses and textures to get teddy bears of different sizes! See how my teddy bear using “Go For Fleece Sherpa” yarn turned out towards the end of this pattern. Notes for how to make the small fuzzy bears using “Chenille Appeal” yarn and the panda version can also be found at the end of this pattern.
Abbreviations & Special Stitches:
• Inc (increase): Work 2 sc in the next stitch. (1 stitch becomes 2 stitches)
• Dec (I use the invisible decrease): Insert hook into front loops of the next two stitches. Yarn over and draw through first two loops. Yarn over and draw through remaining two loops.
• 3 Dc-Bo (3 double crochet-bobble stitch) – for TAIL: [YO, insert hook in st, YO, pull up a loop, YO, draw through 2 loops on hook], rep 3 times in same st, YO, draw through 4 loops on hook.
• 4 Dc-Bo (4 double crochet – bobble stitch) – for ARMS: [YO, insert hook in st, YO, pull up a loop, YO, draw through 2 loops on hook], rep 4 times in same st, YO, draw through 5 loops on hook.
• 5 Dc-Bo (5 double crochet – bobble stitch) – for LEGS: [YO, insert hook in st, YO, pull up a loop, YO, draw through 2 loops on hook], rep 5 times in same st, YO, draw through 6 loops on hook.
PATTERN:
Head:
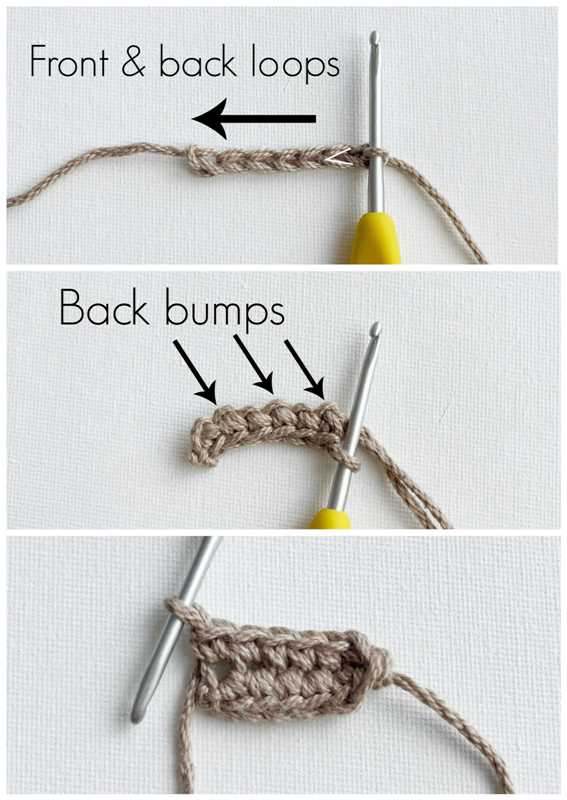
Chain 7 (this is the foundation chain).
R1: Starting from second chain from hook, Sc 6 in both front and back loops of foundation chain (leave back bumps untouched). Turn the chain, sc 6 in back bumps of foundation chain [we are making an oval by crocheting around the chain]. (12 sts)
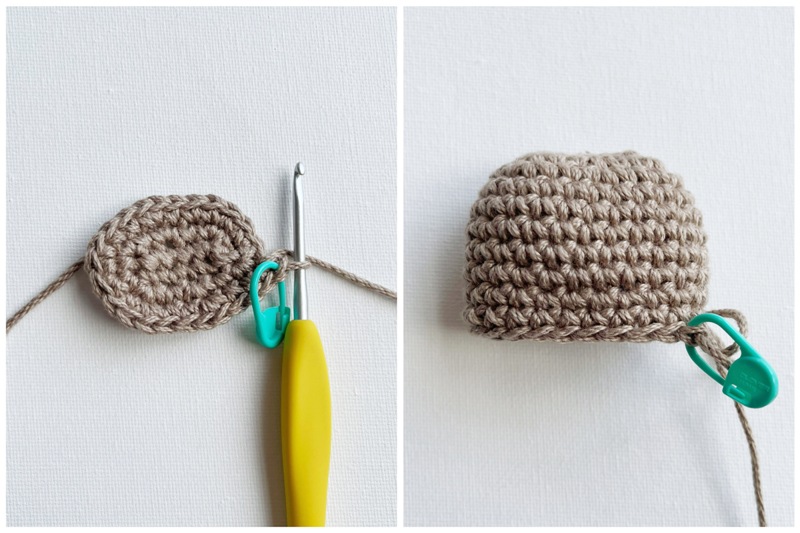
R2: *Sc 1, Inc*, rep 6 times. (18 sts)
R3: *Sc 2, Inc*, rep 6 times. (24 sts)
R4-10: Sc 24. (24 sts)
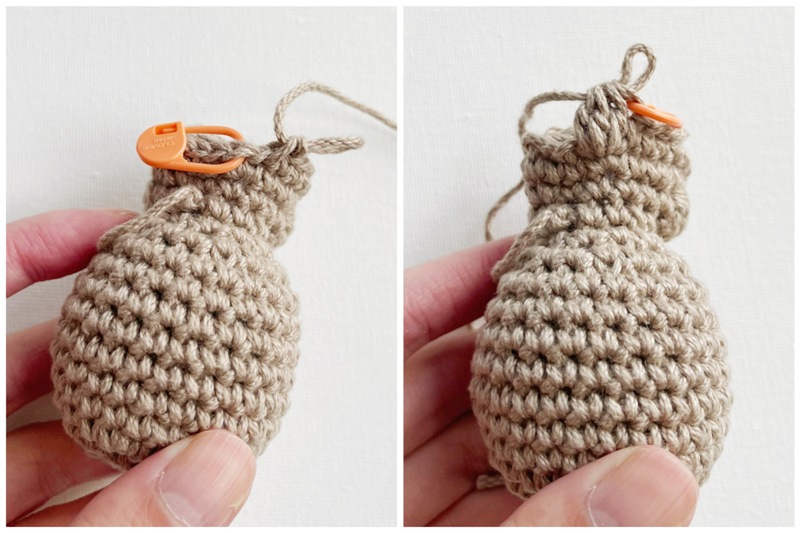
R11: *Sc 2, Dec*, rep 6 times. (18 sts)
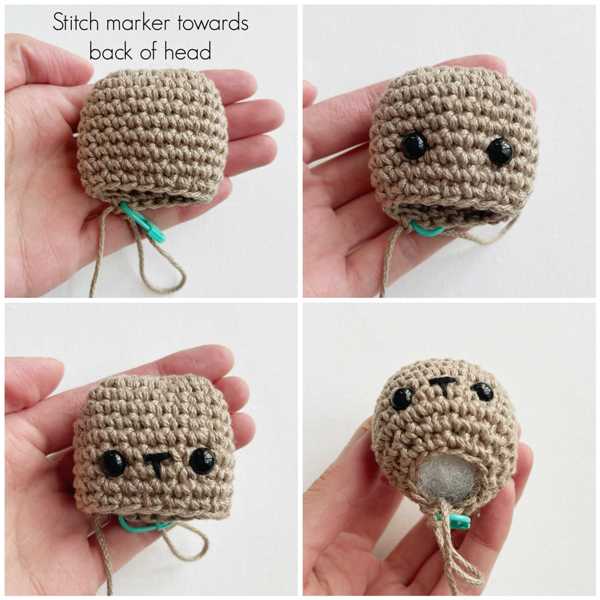
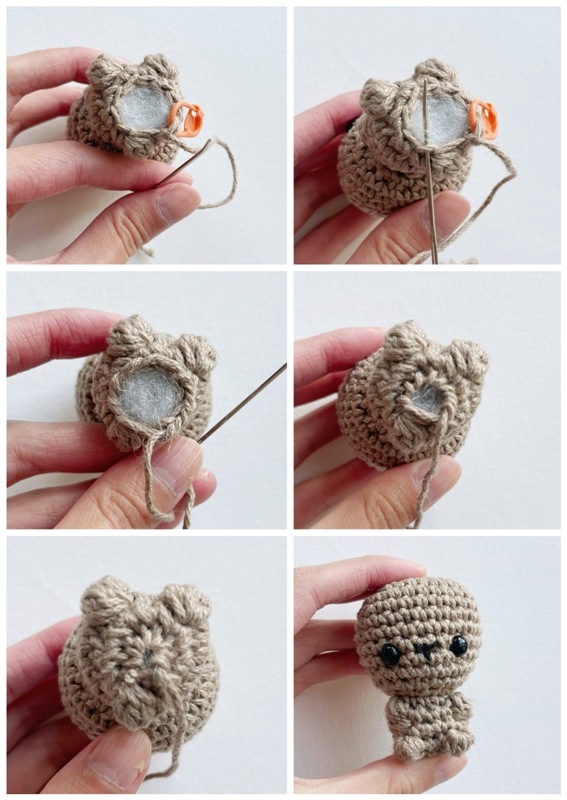
It is now time to place the safety eyes and embroider the nose. Be sure to place the face on the opposite side to where the stitch marker/working yarn is.
Place safety eyes between Rounds 8 and 9, 4 stitches apart. Using embroidery floss, embroider a “T” nose with one horizontal line and one vertical line between the eyes (across Rounds 8 and 9). Stuff head.
R12: *Sc 1, Dec*, rep 6 times. (12 sts)
Finish stuffing.
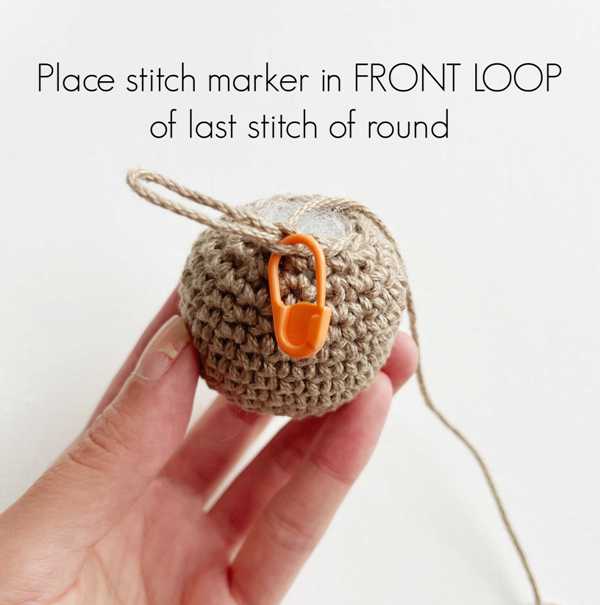
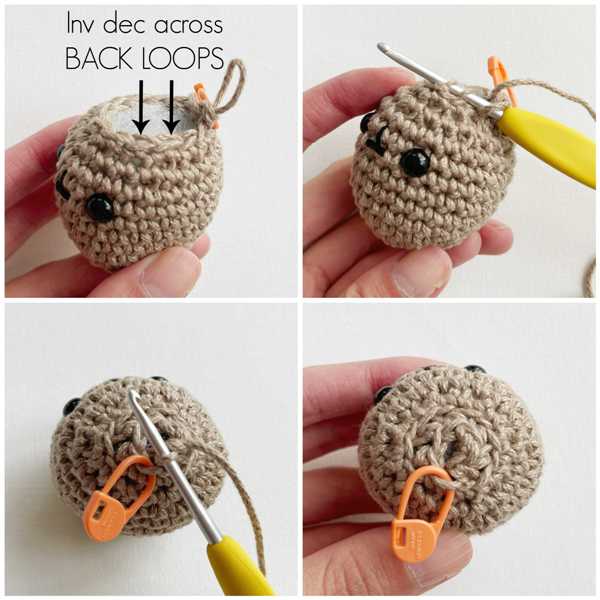
In this next round, we will work invisible single crochet decreases in the BACK LOOPS ONLY in order to leave the front loops untouched. We need to leave these front loops untouched as we will use them when it is time to pick up stitches for the body.
Place a special stitch marker in the FRONT LOOP of stitch 12 (last front loop left untouched). [If you have been using a stitch marker for R1-12, you can simply move this stitch marker to the front loop of the last stitch.]
R13: *Dec across BLO*, rep 6 times. (6 sts)
DO NOT remove the stitch marker! Fasten off and weave in end (do not worry about closing up the hole entirely as the bottom of the head will be covered up by the body).
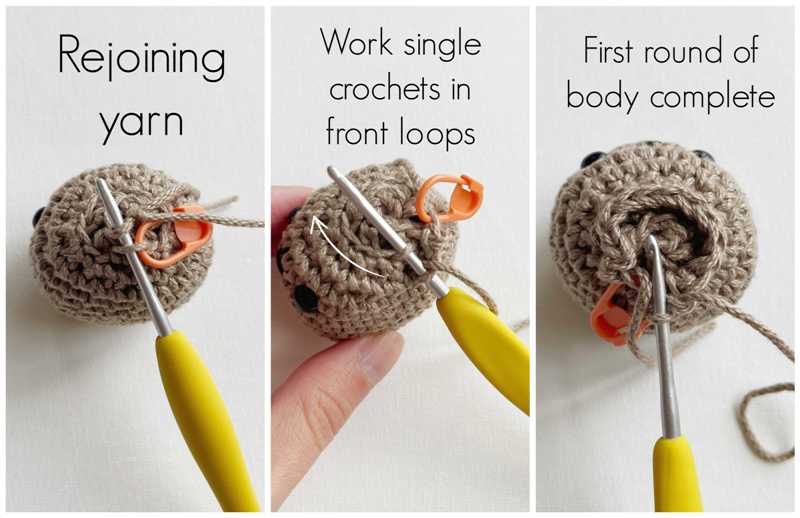
Body:
Hold head upside down. We will be rejoining the yarn where the special stitch marker is placed. Locate all 12 front loops that were left untouched so you know where you will be inserting your crochet hook for Round 1 (you can count backwards from the stitch marker to verify).

Make a slip knot. Insert hook in front loop where special stitch marker is located. Add slip knot, pull through.
R1: Chain 1, sc in same stitch and sc 11 in front loops around, working clockwise. (12 sts)
In this next round, the two bobbles (in italics) will be the arms:
R2: Sc 3, 4 Dc-Bobble stitch, sc 3, 4 Dc-Bobble stitch, sc 4. (12 sts)
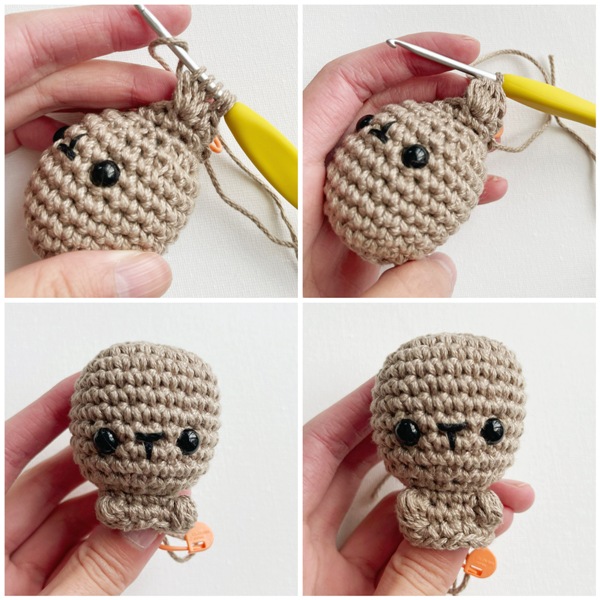
R3: *Sc 1, Inc*, rep 6 times. (18 sts)
In this next round, the three bobbles (in italics) will be the two legs and tail:
R4: Sc 6, 5 Dc- Bobble stitch (leg), Sc 3, 5 Dc- Bobble stitch (leg), Sc 6, 3 Dc- Bobble stitch (tail). (18 sts)
(Collage below shows legs)
(Collage below shows tail)
R5: *Dec*, repeat 9 times. (9 sts)
Stuff body.
Cut yarn, weave end through front loops of remaining stitches. Pull tight and fasten off.
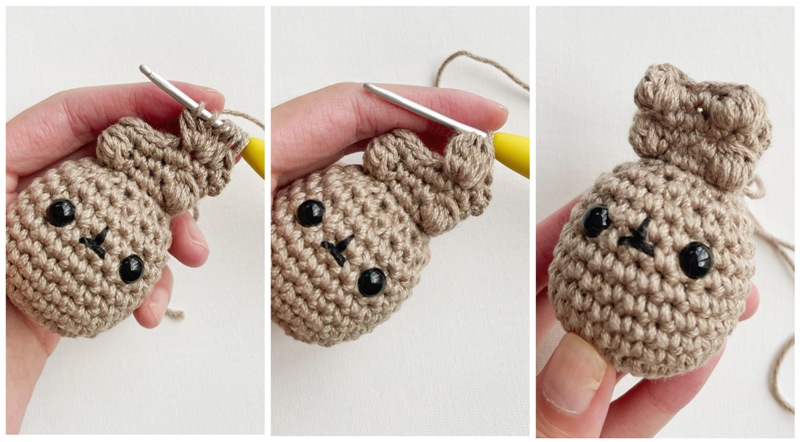
EARS:
Place 2 stitch markers between Rounds 4 and 5 on either side of head. The stitch markers indicate where each ear will be placed.
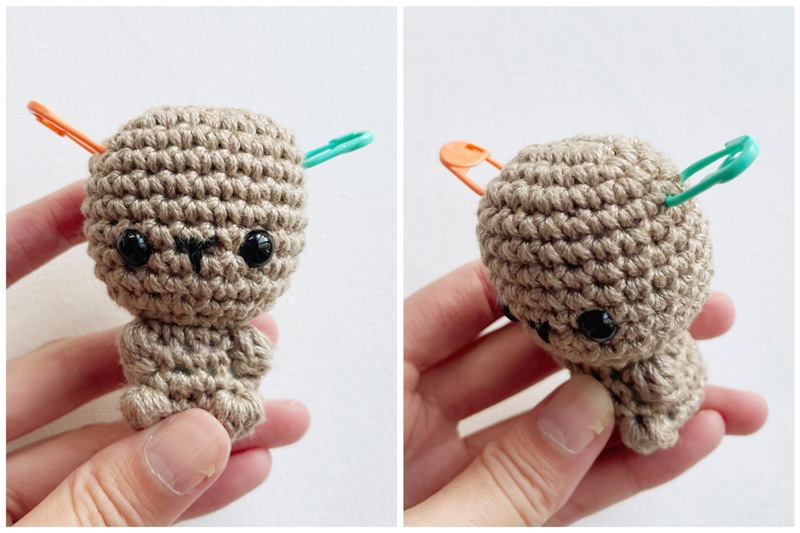
FIRST EAR:
Make a slipknot. Insert hook into space (where one of the stitch markers is located). You will insert your hook from the front of the head to the back of the head (as shown in photos below). Add slip knot, pull through, chain 1.
Work these subsequent stitches all in the same space (where stitch marker is located): sc 1, hdc 1, dc 1, hdc 1, sc 1, slip stitch. Fasten off.
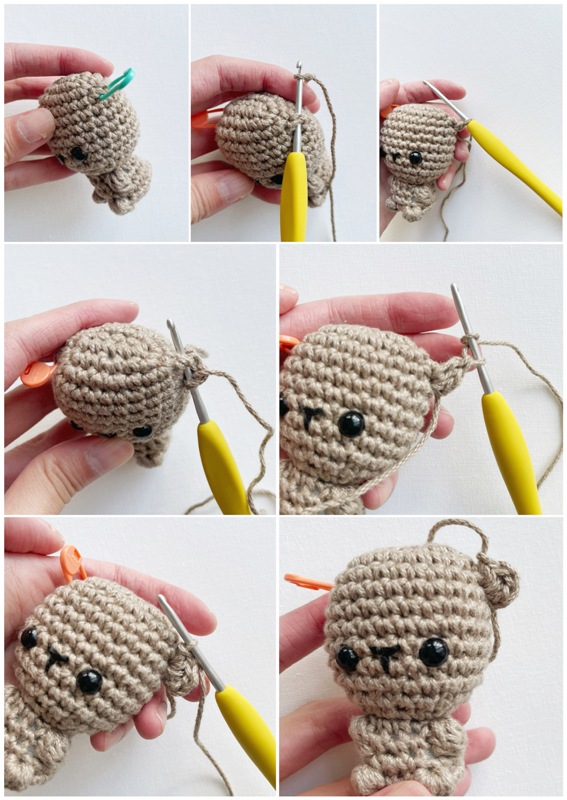
SECOND EAR: Repeat same process as first ear at second stitch marker.
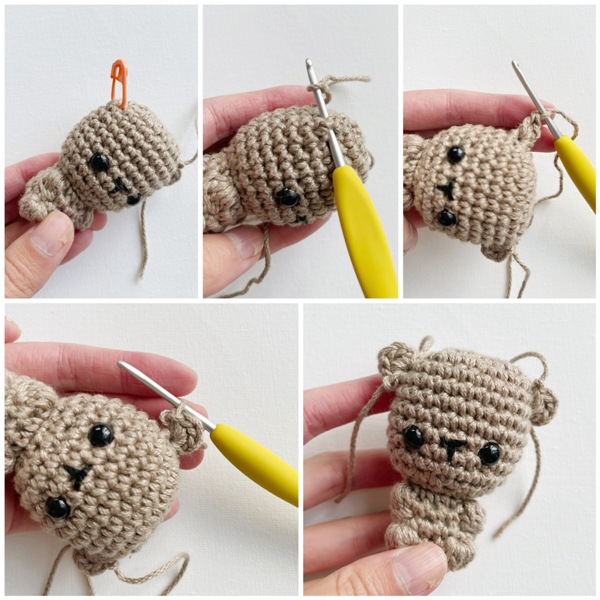
If you are happy with the ear placements, weave in the ends. If you want to reposition the ears (higher or lower or need better symmetry), rip out the stitches and try again.
Optional: Add a keychain to your adorable little teddy!
***Go For Fleece Modifications:
• Use 6.5 mm hook and 18 mm safety eyes.
• The teddy uses approximately 90 g/44 yds in the color “Honey” of Go For Fleece Sherpa Yarn (jumbo level 7 yarn).
• Use stitch markers to mark the front loops of all 12 stitches of the head of Round 12 so they will be easier to locate when it is time to crochet the body.
• I placed my eyes approximately between Rounds 7 and 8 for this teddy.
• Final dimensions: 7.5”/19 cm tall, 6”/15 cm across (from ear to ear)
***Chenille Appeal Yarn:
• Follow pattern exactly as written.
• Each teddy uses approximately 6 g/17yds in the colors “Stucco”, “Coconut Milk” and “Peach Whip” in “Chenille Appeal Yarn” (labeled as worsted weight level 4, but on the thinner side).
• Use stitch markers to mark the front loops of all 12 stitches of the head of Round 12 so they will be easier to locate when it is time to crochet the body.
• Final dimensions: 2.5”/6.4 cm tall, 2.5”/6.4 cm across (from ear to ear)
***Panda Modifications:
Use black yarn for:
– Rounds 1 and 2 of the body
– The legs in Round 4 of the body
– The two ears
Use white yarn for rest of panda.
To change color:
When working last stitch in old colour: work as if typical single crochet until two stitches are left on the hook (i.e. insert hook into stitch, yarn over, pull up a loop). Use new colour to yarn over and pull through both loops.
For leg bobbles in Round 4: Use the white yarn to pull through all the loops to complete the bobble.
*************************
I hope you enjoy crocheting these little bears that require no seaming at all! It is so satisfying being able to finish an amigurumi in one sitting and not need to whip out your yarn needle. My daughter Myla has really enjoyed working through no-sew amigurumi projects, and I’m so happy that I could try my hand at designing one too. I’ve crocheted numerous little teddies in the past (Teddy Keychains & Bonbon Bears), and I’m delighted that I have a no-sew version now! Myla even helped me pattern test this design, so that was a very big milestone!
Have fun using different yarn weights and textures to whip up your own teddy bears! You can use the hashtag #nosewbabybear on social media to share your work and see how everyone else’s bears turned out! Happy crocheting, everyone!
This pattern is an original pattern by Stephanie Lau of All About Ami. Please do not claim this pattern as your own. If you wish to share this pattern, you may link to this pattern but please do not reprint it on your site. You may keep a copy for your own personal use but please DO NOT sell the pattern or distribute it.
You may sell products made from this pattern but please clearly credit the design to me, Stephanie Lau of All About Ami, and provide a link to my blog www.AllAboutAmi.com. Permission is NOT granted for mass production or factory manufacturing of any kind. Thank you for being respectful and for your understanding!