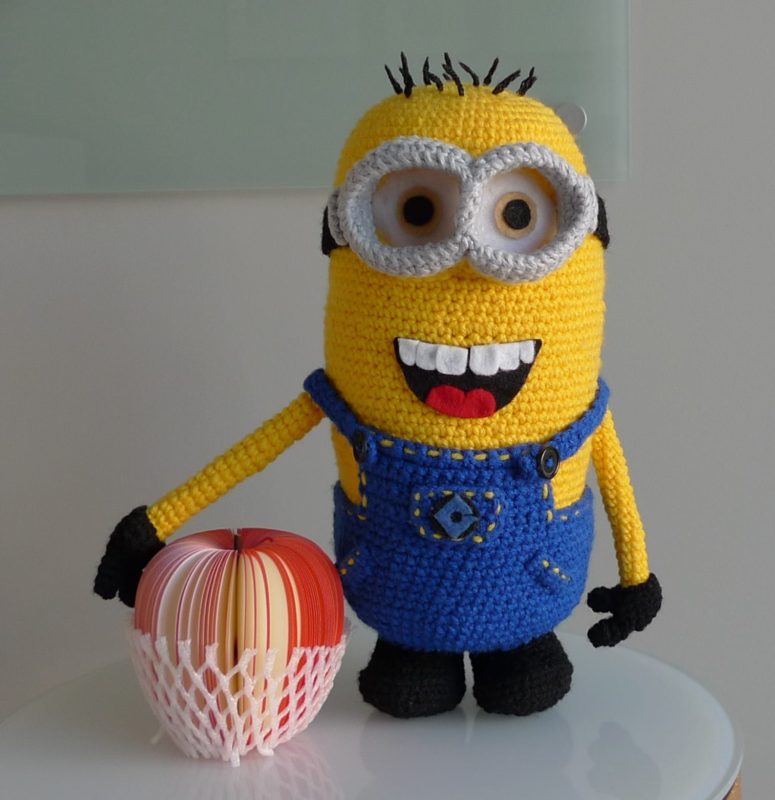
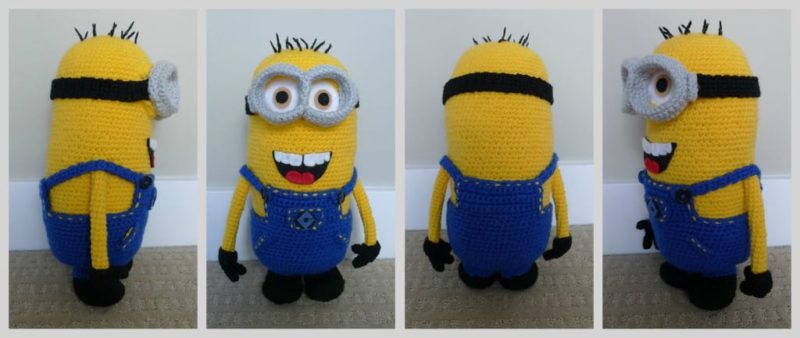
Who doesn’t love the minions from “Despicable Me”? Make your very own detailed minion with removable goggles and removable overalls with my free crochet pattern!

Materials:
- yellow yarn (for head, body, arms and embroidering overalls), blue yarn (for overalls), black yarn (for hair, goggle straps, gloves and boots), grey yarn (for goggles)- I used “Red Heart Super Saver” yarn
- 2.00 mm Clover Amour crochet hook [YES- you read that correctly! I like to have very tight, small stitches when crocheting amigurumi so that no fiberfill is visible. Thus, I use a very small crochet hook! You are more than welcome to use a larger hook- your Minion will simply turn out larger!}
- Yarn needle (bent tip helpful for attaching amigurumi parts- see HERE)
- fiberfill
- white felt (for teeth and eyes), tan felt (for eyes), red felt (for tongue), black felt (for eyes, mouth adn logo), blue felt (for “G” on pocket)
- small black buttons (2)
- glue gun
Note: I worked in continuous rounds (vs. joined rounds). I strongly recommend checking out my blog post here to see step-by-step photos and accompanying descriptions if you are attempting to make this minion. This pattern is quite intricate and is recommended for those with some amigurumi experience (not a beginner’s project). It takes some time to crochet all the different parts, but it’s well worth it in the end!
Finished size: Approximately 14 inches/36 cm in height
HEAD/BODY
Using yellow yarn,
R1: 7 sc in magic ring. (7 sts)
R2: 2 sc in each sc around. (14 sts)
R3: *Sc 1, 2 sc in next sc*, rep 7 times. (21 sts)
R4: *Sc 2, 2 sc in next sc*, rep 7 times. (28 sts)
R5: *Sc 3, 2 sc in next sc*, rep 7 times. (35 sts)
R6: *Sc 4, 2 sc in next sc*, rep 7 times. (42 sts)
R7: *Sc 5, 2 sc in next sc*, rep 7 times. (49 sts)
R8: *Sc 6, 2 sc in next sc*, rep 7 times. (56 sts)
R9: *Sc 7, 2 sc in next sc*, rep 7 times. (63 sts)
R10-55: Sc 63
***Work on hair. Cut strands of yarn measuring about 2″. Tie knots on one end. Pull yarn through head so knot remains on underside. When finished adding hair, trim as needed. Rub ends with glue to prevent fraying.
R56: *Sc 7, dec 1*, rep 7 times. (56 sts)
R57: *Sc 6, dec 1*, rep 7 times. (49 sts)
R58: *Sc 5, dec 1*, rep 7 times. (42 sts)
R59: *Sc 4, dec 1*, rep 7 times. (35 sts)
R60: *Sc 3, dec 1*, rep 7 times. (28 sts)
Begin stuffing body.
R61: *Sc 2, dec 1*, rep 7 times. (21 sts)
R62: *Sc 1, dec 1*, rep 7 times. (14 sts)
Finish stuffing.
R63: *Dec 1*, rep 7 times. (7 sts)
Fasten off and weave in end.
OVERALLS
Using blue yarn,
R1: 7 sc in magic ring. (7 sts)
R2: 2 sc in each sc around. (14 sts)
R3: *Sc 1, 2 sc in next sc*, rep 7 times. (21 sts)
R4: *Sc 2, 2 sc in next sc*, rep 7 times. (28 sts)
R5: *Sc 3, 2 sc in next sc*, rep 7 times. (35 sts).
R6: *Sc 4, 2 sc in next sc*, rep 7 times. (42 sts)
R7: *Sc 5, 2 sc in next sc*, rep 7 times. (49 sts)
R8: *Sc 6, 2 sc in next sc*, rep 7 times. (56 sts).
R9: *Sc 7, 2 sc in next sc*, rep 7 times. (63 sts)
R10-22: Sc 63
Working in rows (vs. continuously around in a circle):
Row1: Sc 17, ch 1, turn. (17 sts)
Row2-7: Sc 17, ch 1, turn. (17 sts).
Fasten off and weave in end. Now make same panel on opposite side of overalls. Count 14 or 15 stitches across left side of panel (when panel facing you). Attach yarn with slilp stitch.
Row1: Ch 1, sc 16, ch 1, turn. (17 sts)
Row2-7: Sc 17, ch 1, turn. (17 sts)
STRAPS (make 2)
Using blue yarn,
Ch 3
R1-28: Sc 2, ch 1, turn.
Once measures about 6.5″, strap splits to form hole for button:
Ch 2 on one side. Fasten off. Attach yarn on other side. Chain 3, sc 1 to join to other side. Ch 1, turn, sc 2. Fasten off and weave in ends. Strap measures about 7″ in total.
FRONT POCKET:
Using blue yarn,
Ch 9
R1-4: Sc 8, ch 1, turn. (8 sts)
R5: Dec 1, sc 4, dec 1. (6 sts)
Fasten off and weave in ends.
SIDE POCKETS (make 2):
Using blue yarn,
Ch 9
R1: Sc 8
Fasten off and weave in ends.
Assembly of Overalls:
- Sew two black buttons onto front of overalls.
- Sew straps onto back of overalls. Place buttons in holes.
- Using yellow yarn, embroider overalls, front and side pockets.
- Cut “Gru” logo out of black and yello yarn. Glue it onto front pocket.
- Glue/sew pockets onto overalls.
ARMS (make 2)
Using yellow yarn,
R1: 7 sc in magic ring.
R2-24: Sc 7
Fasten off and leave long end for sewing.
GLOVE BASE (make 2)
Using black yarn,
R1: 5 sc in magic ring. (5 sts)
R2: 2 sc in each sc around. (10 sts)
R3: *Sc 1, 2 sc in next sc*, rep 5 times. (15 sts)
R4-5: Sc 15
R6: *Sc 1, dec 1*, rep 5 times. (10 sts)
R7: Sc 10
Fasten off and weave in ends.
FINGERS (make 4)
Using black yarn,
R1: 6 sc in magic ring. (6 sts)
R2: *Sc 2, 2 sc in next sc*, rep 2 times. (8 sts)
R3-4: Sc 8
Fasten off and leave long end for sewing.
THUMBS (make 2)
Using black yarn,
R1: 6 sc in magic ring. (6 sts)
R2-3: Sc 6
Fasten off and leave long end for sewing.
Assembly of gloves:
- Attach two fingers and one thumb to glove base as shown in pictures (spread out and curved).
- Attach/glue arm into glove.
- Attach arms onto sides of body.
BOOTS/LEGS (make 2)
Using black yarn,
Ch 7
R1: Sc 6 starting in second chain from hook (choose one side), then work 6 sc on opposite side of chain. (12 sts) [If you are confused about this part, please see this blog post HERE for a visual on how to work on both sides of the chain!]
R2: Sc 12
R3: Sc 2 in each sc around. (24 sts)
R4: Sc 24
R5: *Sc 1, 2 sc in next sc*, rep around. (36 sts)
R6-7: Sc 36
R8: Through back loops only, sc 36.
R9: Sc 14, *dec 1* 4 times, sc 14. (32 sts)
R10: Sc 12, *dec 1* 4 times, sc 12. (28 sts)
R11: Sc 10, *dec 1* 4 times, sc 10. (24 sts)
R12: Sc 24
Switch to blue yarn,
R13-15: Sc 24
Fasten off and stuff. Attach to body.
FACE DETAILS:
- Cut 2 big circles of white felt and 2 smaller circles of tan and black felt for eyes. Glue onto face.
- Use black felt to cut out shape for mouth.
- Use white felt to cut out individual teeth. Glue on upper part of mouth.
- Use red felt to cut out tongue. Glue on bottom part of mouth.
- Glue whole mouth onto face.
EYELIDS (make 2 upper and 2 lower)
Upper (longer)
Using yellow yarn,
Ch 11
R1: Sl stitch to first ch from hook, sc 9, sl st 1.
Fasten off. Glue/sew onto top of eye.
Lower (shorter)
Using yellow yarn,
Ch 10
R1: In second ch from hook, sc 9.
Fasten off. Glue/sew onto bottom of eye.
GOGGLES (make 2)
Using gray yarn,
Ch 31
R1-2: Sc 30, ch 1, turn. (30 sts)
R3: Sc 30
Fasten off.
R4: Join yarn in third ch from hook with slip stitch. Chain 1, sc 25 (26 sts with two extra stitches on each side from previous rows). Ch 1, turn.
R5-7: Sc 26, ch 1, turn. (26 sts)
R8: Sc 26
Fasten off. Leave long end for sewing. Fold strip lengthwise and sew ends together. Bend ends together and sew to form a circle. Sew two goggles together (see pictures to see where).
GOGGLE STRAP
Using black yarn,
Ch 5,
R1-63: Sc 4, ch 1, turn.
R64: Sc 4
Fasten off and leave long end for sewing. Strap should measure about 11″ (check to see if it fits snugly around head when attached to goggles). Sew straps to goggles.
GOGGLE SIDE DETAIL (make 2)
Using gray yarn,
Ch 5,
R1: Sc 4, ch 1, turn.
R2: Sc 4
Fasten off. Fold lengthwise and sew together. Attach to sides of goggle.

Now you have a minion to do your bidding and accompany you everywhere you go! Try out different facial expressions (surprised, suspicious, scared) or make them cyclopses! Each minion has their own personality! The sky’s the limit!
***Get the pattern in Dutch HERE! Hier vindt u de Nederlandse vertaling!
[Update: People all over the world have been using my pattern to make absolutely AMAZING Minions with lots of variation! Check them all out in my Crochet Corner posts HERE (from 2012) and HERE (from 2013)!]
Amazon affiliate links:
The minions from “Despicable Me” are copyright of Universal Pictures and Illumination Entertainment. This pattern is copyright of Stephanie of All About Ami (October 2011). Please do not claim this pattern as your own. If you wish to share this pattern, you may link to this pattern but please do not reprint it on your site. You may keep a copy for your own personal use but please DO NOT sell the pattern or distribute it.


